Looking for some tasty sausage or just want to know where things really are from? Let’s make Kielbasa sausage as they did of old!
Kielbasa is the Polish word for sausage and kielbasa is nothing more than a sausage. Although in the States kielbasa generally means one particular variety of the sausage, it can be much more than that.
What is kielbasa?
Back in its native land, kielbasa comes in many forms and, not surprisingly, flavors that can differ from region to region or if it is made at home then from household to household. Unfortunately, we can’t really experience their greatness as most of those sausages never find their way over the pond.
The only sausage that really found its way to our heart seems to be the somewhat standardized sausage that is called back in its land as the “Old countryside sausage” or just simply “Polish sausage”.
Is kielbasa the same everywhere?
Of course, this doesn’t mean that shops importing the same sausage that Polish consumers enjoy back in the old continent but rather that sausages are produced with similar characteristics, yet the local consumers or more importantly profits in mind.
If we aren’t in a focus group or aren’t lucky enough to be selected into localized experimental product launches then our chance to try kielbasa is slim to none, let alone influence their making.
Except, of course, if we are willing to make them in the coziness of our kitchen.
Can kielbasa made at home?
Making sausage at home isn’t the cleanest of affairs and it’s certainly not for those who can’t bear the touch of meat under their nails. Luckily, we don’t have to task grannies to pull the crap out and clean the casings anymore, as it was the case at traditional pig slaughters, since we can buy casing cheaply at our favorite butcher, but still, it’s far from baking apple pies.
Nor we have to butcher a whole pig at our back yard to get the necessary meat for the sausages. Our favorite butcher must have everything we need or if they don’t, they are ready to order to our liking the right amount of fatty and lean meat for our home kielbasa project.
What does kielbasa need?
If we plan to fill half of our freezer up with kielbasa or with any sausage at all then we better get hold of a motorized and fairly big capacity sausage filler. Not because those puny little hand sausage fillers from AliExpress or Amazon wouldn’t be good enough but cranking out 4 lbs. / 2kg of sausage with them isn’t something that someone wants to do on an average Tuesday afternoon.
Not like the more expensive and even better-looking attachment of our favorite stand mixer would be gradually better, but saving a couple of minutes and casing replacements must be worth it.
What we need for kielbasa?
Not to mention the pride on our face when we mention to our friends (with detailed explanation about how expertly we can pull casing onto the tube with a bit of filling poking out, making the whole process easier) that the sausage, we are about to throw to the barbecue is made entirely by us.
Sure, when we finish the last batch and finally have some time trying our very own homemade kielbasa, right at the first bite, we realize that salt shouldn’t be just poured into the mix but carefully measured. It gets into a totally different light why everybody asked about the origin of the sausages.
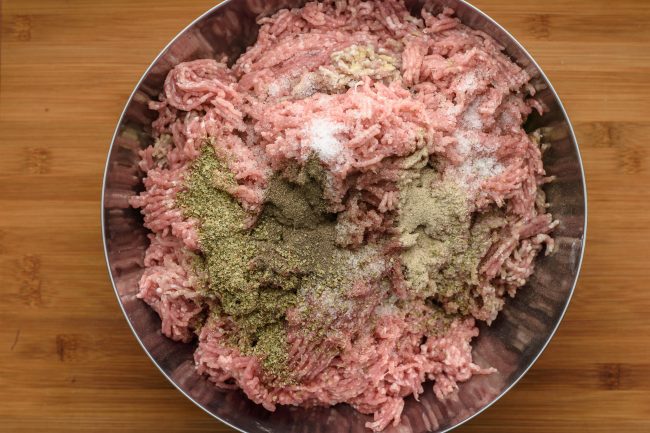
Ingredients
- Pork casing
- 4lb / 2kg Pork (lean, ground pork butt)
- 1 lb / 0.5kg (fatty, ground pork belly)
- 6 cloves / 35g Garlic (crushed or grind with the meat)
- 2 teaspoons / 1g Marjoram
- 1 teaspoon / 3g Black pepper (ground)
- 1 teaspoon / 3g White pepper (ground)
- 2 tablespoons / 36g Salt
How to make Kielbasa sausage
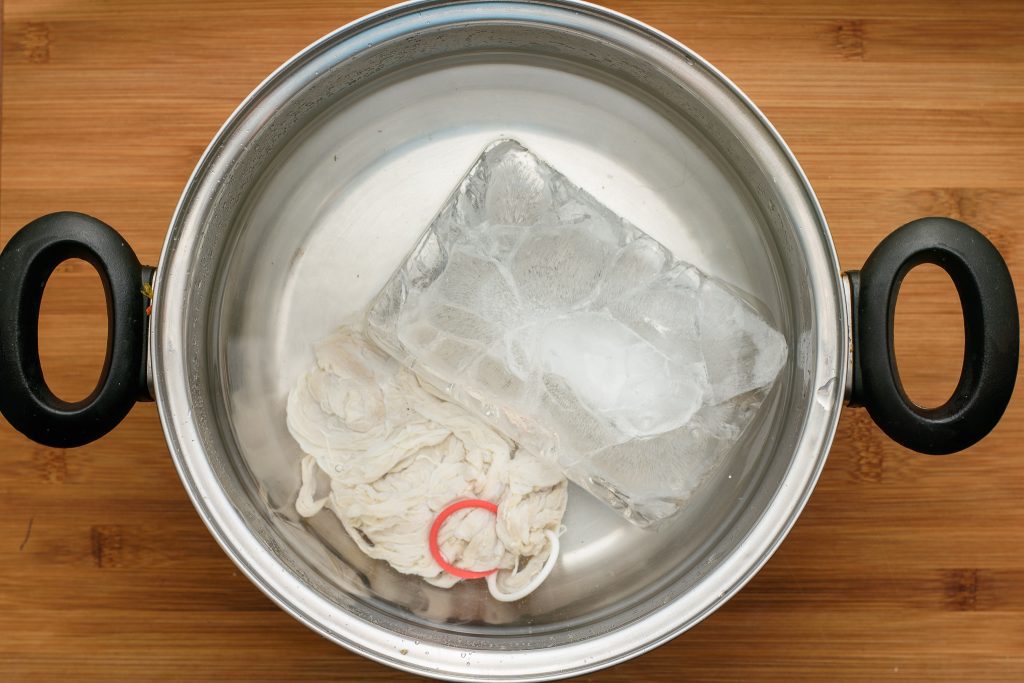
- Soak the casing into iced water and keep it there until finished. Replace the ice if necessary.

- Grind the meat if necessary and measure the rest of the ingredients.
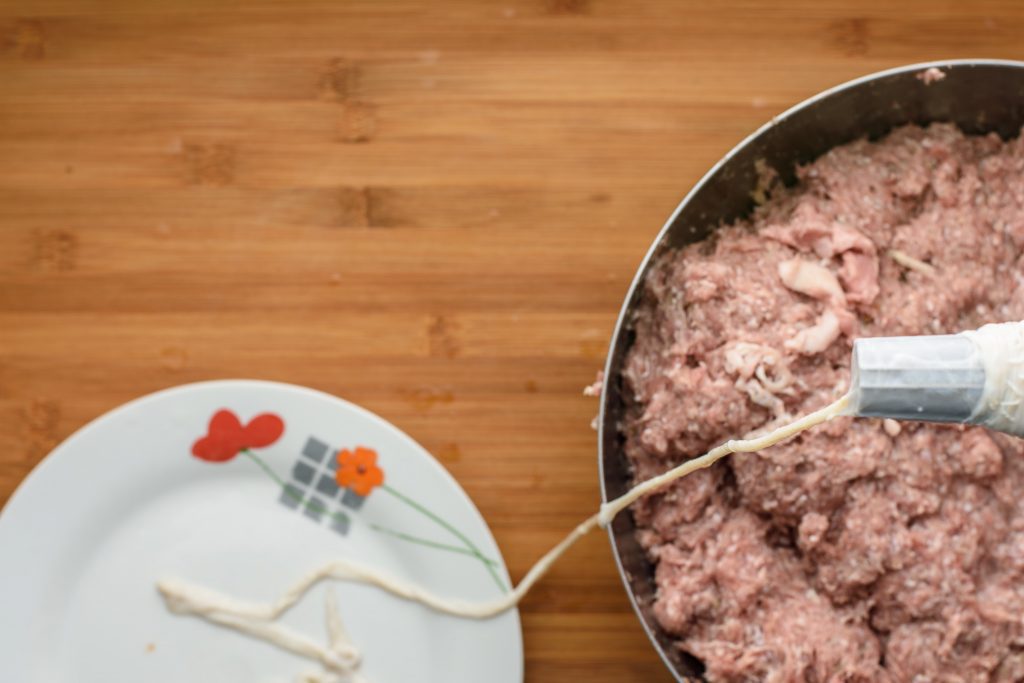
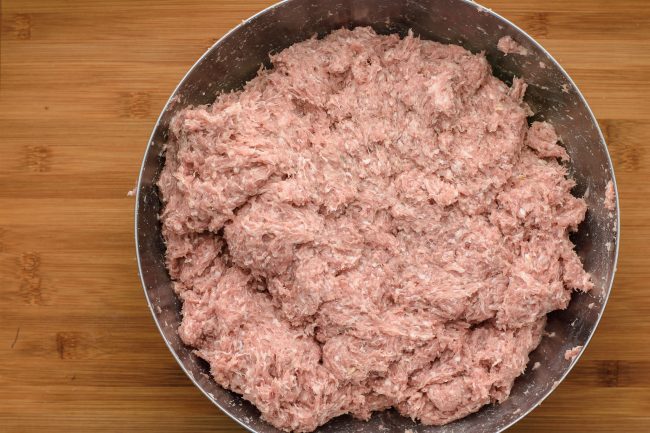
- Mix everything together. Depending on what type of filling machine we have, prepare for its filling too. Stand mixers will require the meat to be rolled into easily swallowable logs.
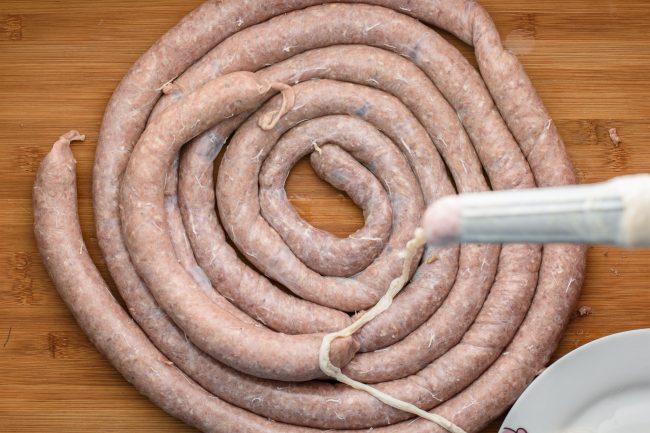
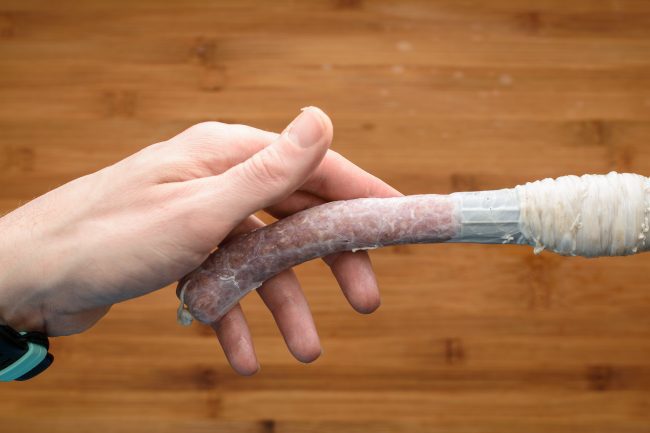
- Pull the casing onto the filler tube. Don’t forget to push about an inch / 2 cm filling out so the casing will slide on easier. Pull as much casing on as it is possible so we don’t have to keep replacing it.
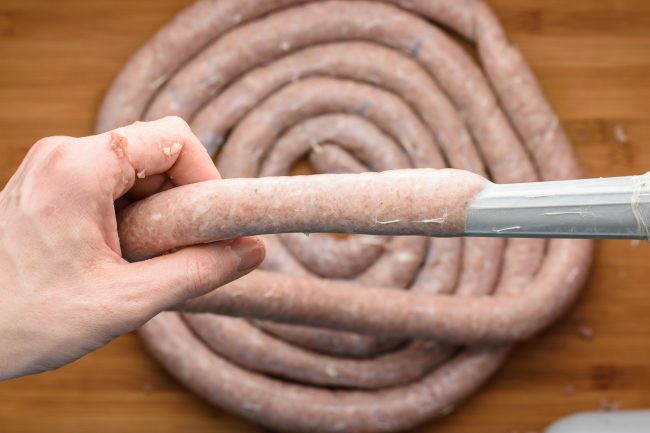
- Start pushing the filling out. Optionally make a knot at the end and punch a hole on the casing so the air can escape. Control the amount of meat gets into the casing by holding onto the casing around the tube or releasing it.
- As the kielbasa comes off the tube, roll it up. If the casings break, just remove enough filling at the end, make a knot and carry on like at the beginning. If the casings dry out and it sticks on the tube, apply some water.
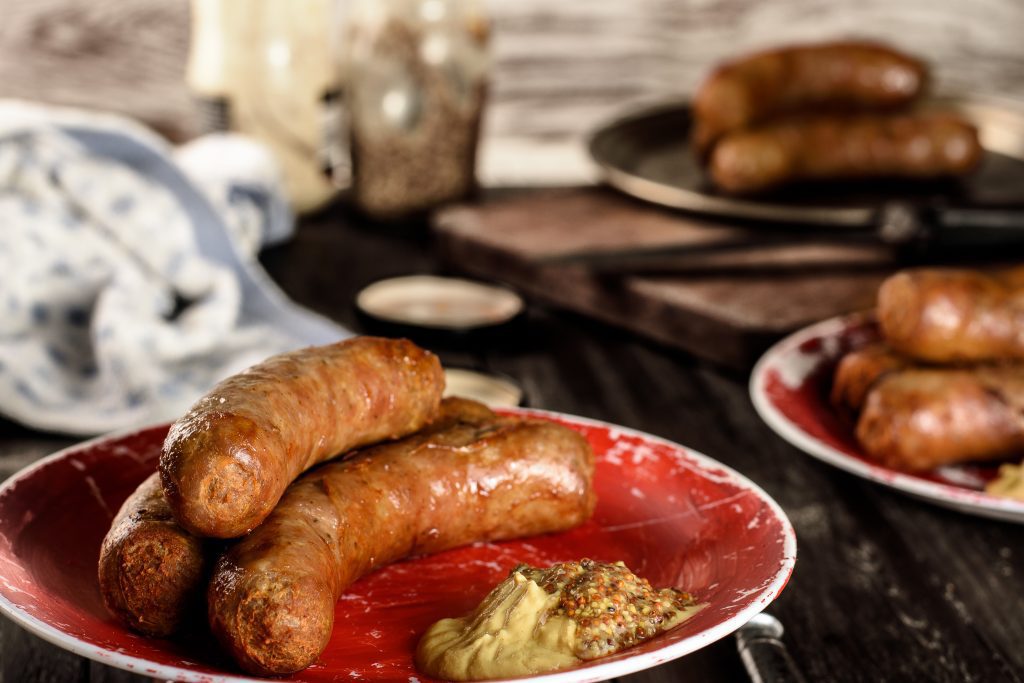
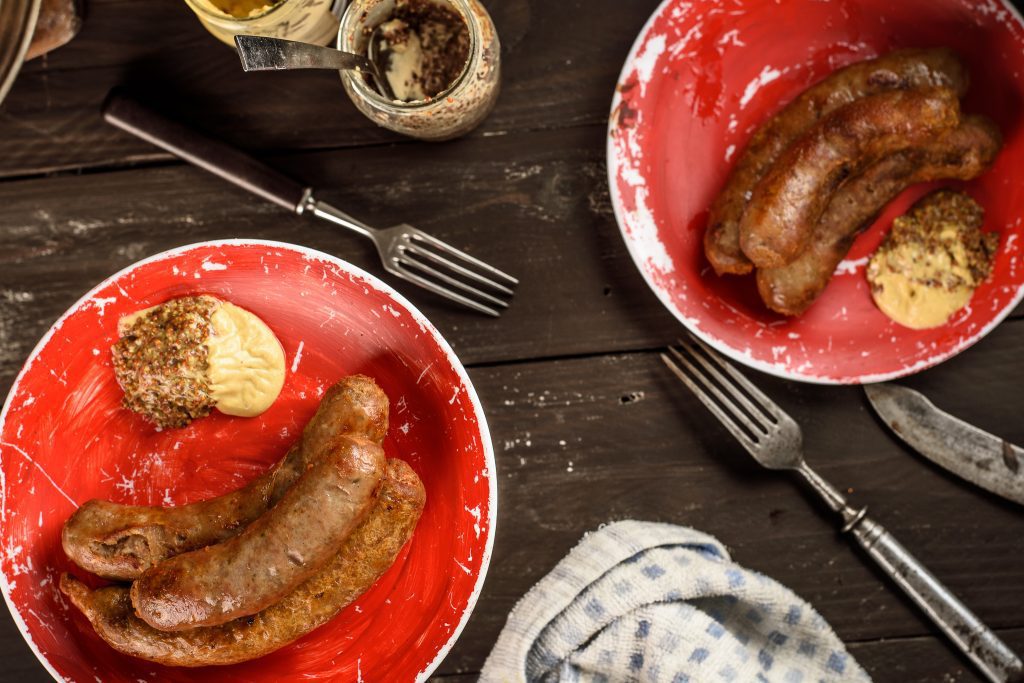
- Make the links on the kielbasa sausage. Roast, fry, cook or freeze them as desired.


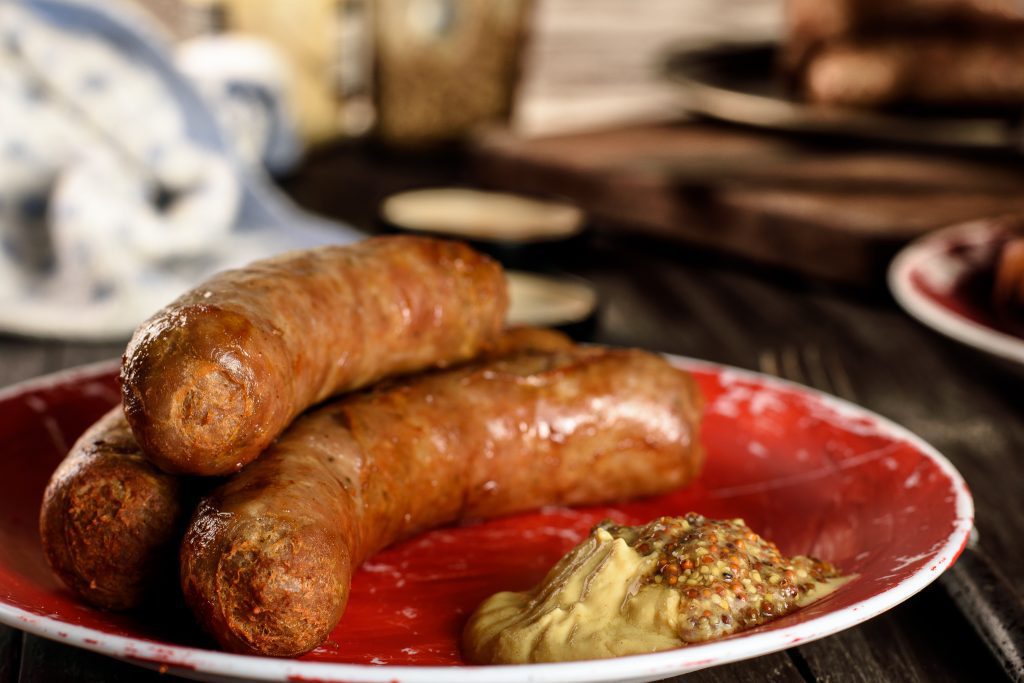
Enjoy!
Notes: Once the necessary casings are used the leftover should be, drained heavily salted and put back the fridge, use it up to a year. Storing it in the freezer is also an option but mind that it weakens the casing.
Sausages are our favorite and our best. Check them out all without rest!

Kielbasa Sausage Recipe
Ingredients
- Pork casing
- 4 lb Pork lean, ground pork butt
- 6 cloves Garlic crushed or grind with the meat
- 2 teaspoons Marjoram
- 1 teaspoon Black pepper ground
- 1 teaspoon White pepper ground
- 2 tablespoons Salt
Instructions
- Soak the casing into iced water and keep it there until finished. Replace the ice if necessary.

- Grind the meat if necessary and measure the rest of the ingredients.
- Mix everything together. Depending on what type of filling machine we have, prepare for its filling too. Stand mixers will require the meat to be rolled into easily swallowable logs.
- Pull the casing onto the filler tube. Don’t forget to push about an inch / 2 cm filling out so the casing will slide on easier. Pull as much casing on as it is possible so we don’t have to keep replacing it.
- Start pushing the filling out. Optionally make a knot at the end and punch a hole on the casing so the air can escape. Control the amount of meat gets into the casing by holding onto the casing around the tube or releasing it.
- As the kielbasa comes off the tube, roll it up. If the casings break, just remove enough filling at the end, make a knot and carry on like at the beginning. If the casings dry out and it sticks on the tube, apply some water.
- Make the links on the kielbasa sausage. Roast, fry, cook or freeze them as desired.


Notes
Nutrition
Pin now, Enjoy later!

Fun family project! I bought an inexpensive sausage attachment for my KitchenAid mixer over a year ago. We discussed and researched the recipe and method and finally were able to get together and make our Polish sausage. Pork butts were on sale for $1.69 a pound–what a bargain! I bought casings online and will check and buy from a local butcher next time. We had plenty of garlic, my son wanted MORE (used 4 heads) and all black pepper, salt, marjoram with 15 pounds pork butt. One suggestion I saw online said to refrigerate (almost freeze) the pork chunks before grinding to prevent overheating the mixer. We used the coarse blade to grind. It looked like a lot of fat in the mixture, but when cooked it was perfect. I used my food processor to finely chop the garlic with water and spices . We refrigerated our meat mixture overnight and filled the sausages the next day. We cooked some for lunch and packaged and froze the rest in food saver bags. This project really needs three people to have things go well.
The more the merrier 😀
Thanks for the feedback! We’re really happy for your success!