
Beginner Friendly Flower Embroidery Stitch Along
Table of Contents
I have 7 flower embroidery stitch along patterns to share with you because flowers are probably one of the most popular things to embroider, and it’s understandable as to why. There are so many colors, shapes, and forms to choose from that you’ll never get bored.
To hand embroider flowers you really don’t need fancy stitches to create them. Basic embroidery stitches are all you really need, and that’s what I’ll use for these flowers.
For each flower I’ll provide the thread color and stitches to use. This flower embroidery tutorial lesson is perfect for beginners, but you may want to take a peek at my individual stitch tutorials so you are familiar with the stitches. It’ll make it much easier so I highly recommend doing so. I’ll include clickable links throughout this post, so you can visit them and learn as you go.
You’ll also need a template so be sure to download it here:
The Flowers:
The template will cover 7 flowers and this stitch along is divided into two blog posts. Part one (today’s tutorials) covers the rose, daisy, cosmos, and lavender and part 2 will consist of the thistle, dandelion, and forget me not.
Each of the flowers are kept simple as far as design goes, so nothing super fancy because it’s meant to be beginner-friendly. It should act as a base from which you can add your own style later on. Regardless, simple can still create some really pretty things.
Flower Embroidery 1: Rose
- Thread colors: dmc #666 & dmc #3346
- Stitches: woven wheel & satin stitch
STEPS
Create the rose with the woven wheel with 6 strands of dmc #666
- Add 5 straight stitches to divide the circle into pie shapes.
- Bring needle up at the center and weave over and under each stitch as you go around and around until you’ve covered the circle. Use the blunt end of the needle if the point snags onto your fabric.

Use your fingers to gently push the thread into place when needed, and take your time. Fluff out the woven wheel with your needle when you’re done.
Use the satin stitch and 6 strands of dmc #3346 to create the leaves. Simply add each stitch from one end of the leaf to the other until it’s covered.

Tips:
- If you should run out of thread before you're finished just push your needle to the back next to a straight stitch then return back up with your new thread near that and continue.
- If you can still see the tips of the straight stitches when you’re finished weaving you can add a few straight stitches around the outside which will curve around your rose and cover them up.
Flower Embroidery 2: Daisy
- Thread colors: white & dmc #743
- Stitches: lazy daisy stitch & french knot
STEPS
Use the lazy daisy stitch to create each petal using 6 strands of white.
- Make a closed loop by coming up and back the same hole along the circle.
- Come up at the top of the petal guidelines, through the loop.
- Return to the back at the top of the loop on the outside of it.
- Do this for each petal.

Create the center with the lazy daisy stitch and use 6 strands of dmc #743. Use 2 wraps:
- Come up to the top of your fabric and wrap your thread twice around your needle.
- Push needle halfway back into the fabric and gently pull thread until the wraps hug the needle.
- Then pull needle through from the back to form a knot on the front.

Flower Embroidery 3: Cosmos
- Thread colors: dmc #666 & dmc #3346 (EDIT)
- Stitches: satin stitch & french knot
STEPS
Create the petals with 6 strands of dmc #604 using the satin stitch.
- Divide each shape into 2 or 3 sections, then fill each section OR simply fill starting from one end to the other.
- To keep it from getting too bulky near the center, make some of your straight stitches shorter so they return to the back a few millimeters away from the center. Use nearby stitches to cover the gap.
- Fill the center in with 6 strands of dmc #743 using french knot. Just like the daisy flower, use 2 wraps.

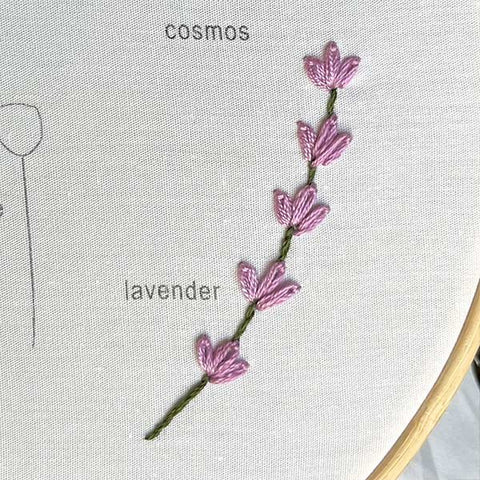
Flower Embroidery 4: Lavender
- Thread colors: dmc #3836 & #3346
- Stitches: stem stitch & lazy daisy stitch
STEPS
Use the stem stitch with 4 strands of dmc #3346 to create the stem
- Make a small stitch
- Come up a small gap length away
- Nudge the previous stitch over to the right and return to the back
- Repeat.

Use 6 strands of dmc #3836 to create the flowers with the lazy daisy stitch.
- Make a closed loop
- Push needle up at the top of the loop, on the inside
- Stitch down the loop by returning to the back at the top of the loop, on the outside.
Head over to part 2 of this flower embroidery tutorial for 3 more flowers.