
This article is about free wishing well plans. Building a wood wishing well is a fun project, as you have to use several basic woodworking techniques and your imagination, to get a decorative structure for your garden. Before starting the actual project, you have to choose the right free plans for your needs, tastes and budget. You have to know that you can either build a full scale wishing well, or you can make a small version and use it as a planter. Irrespective of your choice, you should select the lumber with great care and choose only the pieces that don’t have any visible signs of damage.
If you want to build a full size wishing well and place it into you backyard, you should build a concrete slab foundation. Dig about 10” in the ground, build a rigid formwork from 2x4s and secure it with several stakes, every 1′. Use a spirit level to plumb the form and ensure it is perfectly horizontal. Use several rebars to build a dense reinforcing net and install it into the form. Mix a small quantity of concrete (2 parts cement, 3 parts sand, 4 parts gravel and water), pour it into the form and level the slab with a straight edge, along the sides of the form.
Select the lumber with great care, making sure the boards are perfectly straight and and don’t have any signs of damage. We recommend you to use wooden boards designed for outdoor use, such as pressure treated lumber, redwood or cedar. In addition, measure the diagonals of the wooden base, as to make sure the corners are right-angled. Pre-drill holes before inserting the screws, otherwise the wood might split.
Made from this plan
In order to build the wooden wishing well, you need the following:
Materials
- A – 12 pieces of 2×4 lumber – 40” long, 12 pieces of 2×4 lumber – 48” long BASE
- B – 2 pieces of 2×6 lumber – 80” long PALINGS
- C – 4 pieces of 2×4 lumber – 31 1/3” – one end cut at 30º, 2 pieces – 54 1/5” – ends cut at 60º RAFTERS
- D – 2 pieces of 3/4” tongue and groove plywood – 31 1/3” x 48” ROOFING SHEETS
- E – 30 sq ft of roofing felt, 30 sq ft of asphalt shingles ROOFING
- F – 1 piece of1x1 lumber 48” long, 1 piece of 1×4 lumber 20” long SPINDLE
- G – 8 pieces of 2×6 lumber – 43” , 4 pieces of 2×4 lumber – 21 1/4” long LID
- H – 4 pieces of 1×2 lumber – 33” – both ends cut at 3oº, 2 pieces of 1×2 – 47 1/4” TRIMS
Tools
- Safety gloves, Eye protection
- Circular saw, Jigsaw
- Hammer, Spirit level, Carpentry Pencil
- Drill machinery and drill bits
Tips
- Plumb the palings with a spirit level
- Drill pilot holes, before inserting the screws
- Apply several coats of varnish over the wooden components
Time
- One weekend
Building wishing well plans

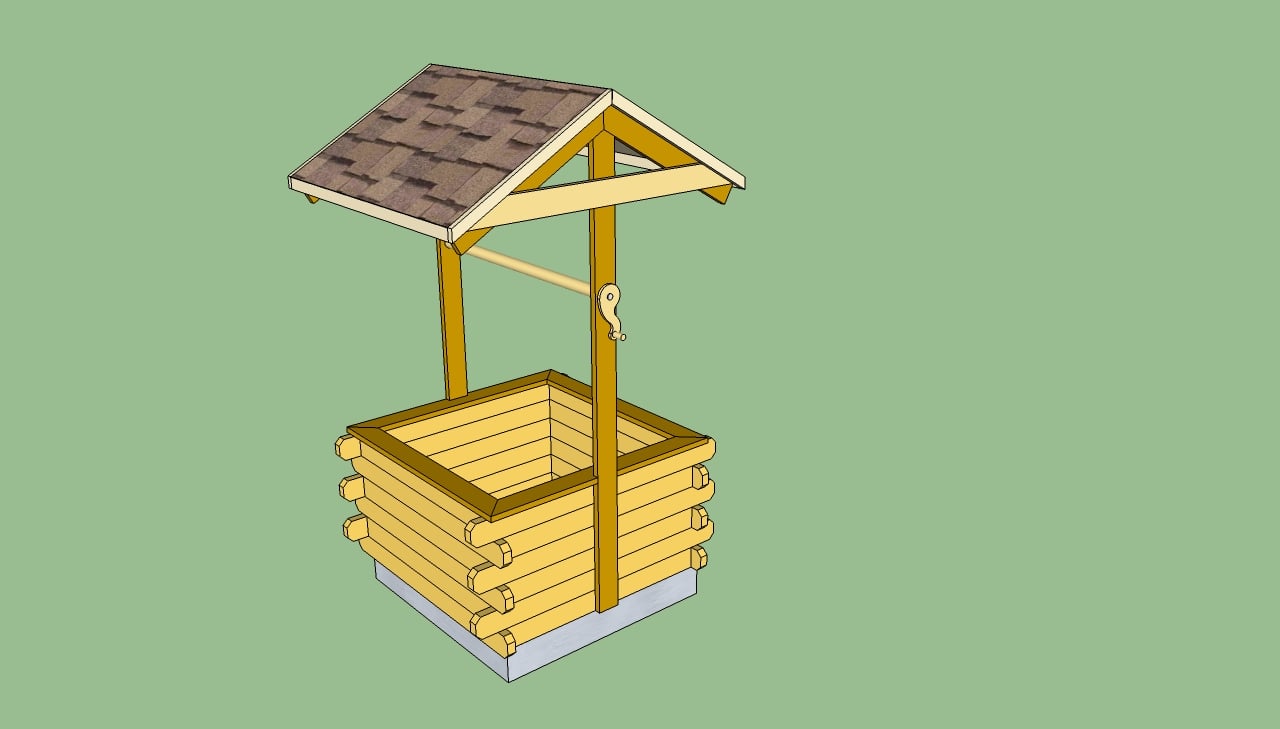
Building a wishing well
There are many designs and shapes you could choose from when building a wooden wishing well in your backyard. In this article we show you all you have to know about building a rustic rectangular well.
Free wishing well plans

Concrete slab plans
First of all, you should build a concrete slab to support the wooden wishing well. Even though this step is not compulsory, it is highly recommended if you don’t intend to move the construction from place. Therefore, you have to build a 40×40” form using 2x4s and to secure it into position, by installing wooden stakes.
Install a rebar net to reinforce the concrete. Pour the concrete in and level it with a straight edge, along the formwork.

Wishing well base plans
Let the concrete dry out for at least 48 hours. Meanwhile, you should cut the elements of the wishing well’s base, using our free plans. Therefore, you have to use cedar, redwood or pressure treated 2x4s and cut them accurately with a circular saw. Drive in 3” screws through the long elements in the ends of the short slats.

Paling for wishing well
Next, you have to build the side palings of the wishing well from 2x4s. This procedure is straight forward, as you have to make a few cuts using a circular saw.
Make sure you cut the top of the paling at 30º on both sides, as in the image. This aspect is essential for your project, as this will determine the slope of the roof. If you want to adjust the slope to your tastes, this is the time to make the changes.

Free wishing well plans
Afterwards, you have to build four rafters and install them on top of the palings, as in the image. Use 2×4 boards and cut one end at 60°, in order to obtain wooden components as in the image.
Secure the rafters into position by driving in several screws though the top of the rafters in the wooden palings. Drill pilot holes before inserting the screws, to avoid splitting the wood.
Wooden wishing well plans

Wishing wel frame
Align the palings one with another properly and center them accurately. Next, before installing the palings into position, you have to drill at least three pilot holes through the palings in the base of the well. Secure the elements into place by installing lag bolts in the pre-drilled holes.

Building wishing well plans
Continue the woodworking project by building the collar tie. This wooden element built from a 1×4 slat has an essential role, as it locks the rafters and the palings together in a rigid structure.
Building a basic wishing well is not that difficult, if you use the right plans for your needs, tastes and budget. Measure everything twice, to make sure the size is accurate and the component will fit into place perfectly.

Wishing well plans free
Use a 1×1 wooden piece to build the spindle and the handle of the wishing well, or buy one already finished from your local diy store. In order to build the spindle, you can also use cylindrical metal piece and cover it with wood.
The spindle should be about 43” long, but if you have adjusted the size of some components, you should measure the distance between the palings before building it.

Building the roof of the well
You can build the roof of the wishing well in several ways: one one hand you can install roofing boards (1×6), or you could attach asphalt shingles over the boards to get a modern look. Irrespective of your choice, you should protect the lumber with appropriate products, in order to avoid decay or water damage.
Secure the boards into place by driving in 3” screws through the boards directly in the rafters. Align the boards at both ends, before locking them into position.

Installing shingles on the roof
If you want to mask the edges of the roofing boards, you should install 1×2 wooden trim (fasten it with finishing nails). Next, you have to install the shingles, starting with the bottom of the roof.
Work with great care, otherwise you might leave gaps between the asphalt shingles or split the roofing boards. Don’t forget to seal the gaps between the shingles with appropriate products and to install the ridge cap shingles.

Wooden well plans
Last but not least, you should build the spindle and the handle of the wishing well. Therefore, you could either use 1×1 lumber to build the spindle, or you could buy round lumber, from your local diy store.
Next, build the arm of the handle from 1×4 lumber, choosing any shape that satisfies your tastes. Secure the arm to the wooden washer and drive screws through the washer in the spindle, after drilling several pilot holes.

Wishing well plans
After you have installed the wood or asphalt shingles on the roof of the wishing well, you have to apply several coats of protective varnish over the wooden components.
In addition, you can also improve the look of the structure, by installing 1×4 trim over the top edges of the wishing well’s base. Cut the ends of the boards at 45º and lock them into position with finishing nails.

Wishing well lid plans
On the other hand, you could build a wooden lid to cover the base of the wishing well. In order to obtain a nice appearance, we recommend you to build the top components from two parts, each having the same size.
Place the 2×6 slats on a level surface and lock them together with two 2×4 braces. Adjust the width of one slat in each components, with about 3/4”, otherwise the top wont’ open properly.

Wedding Wishing Well
Install one pair of hinges on both sides of the wishing well, in order to secure the top to the base. Make sure the edges of the components are flush with the exterior of the base.
Thank you for reading our article about free wishing well plans and we recommend you to check out the rest of our projects. Don’t forget to share our articles with your friends, by using the social media widgets.


