Drawing Eyes at Different Angles
Contact Graphixly @
Hello! My name is Liz Staley and I’m a long-time user of Clip Studio Paint (I started using the program back when it was known as Manga Studio 4!). I was a beta-tester on the Manga Studio 5 program and for Clip Studio Paint, and I have written three books and several video courses about the program. Many of you probably know my name from those books, in fact. I write weekly posts on Graphixly.com and on CSP Tips, so be sure to come back every week to learn more Clip Studio Tips and Tricks from me!
The eyes are the window to the soul, and eyes are really important in character drawing! Especially in anime-inspired art styles, where a character’s eyes are often exaggerated to make them more expressive and appealing. Drawing eyes can be difficult for some beginner artists though, so in this article I’ll be covering the basics of drawing eyes with a concentration on drawing from different angles as the character’s head moves around.
In this article we will cover the following topics:
The basics of the human eye
Eyes from different angles.
Let’s go ahead and get started!
The Basics of the Human Eye
Before we can draw cartoon or anime style eyes, we need to know a bit about the anatomy of the human eye. As humans, we spend so much time looking at other humans’ eyes, so instinctively we know when a drawing of a human face looks ‘off’, so before we stylize we should know a few basics of what makes the eye look like a human eye.

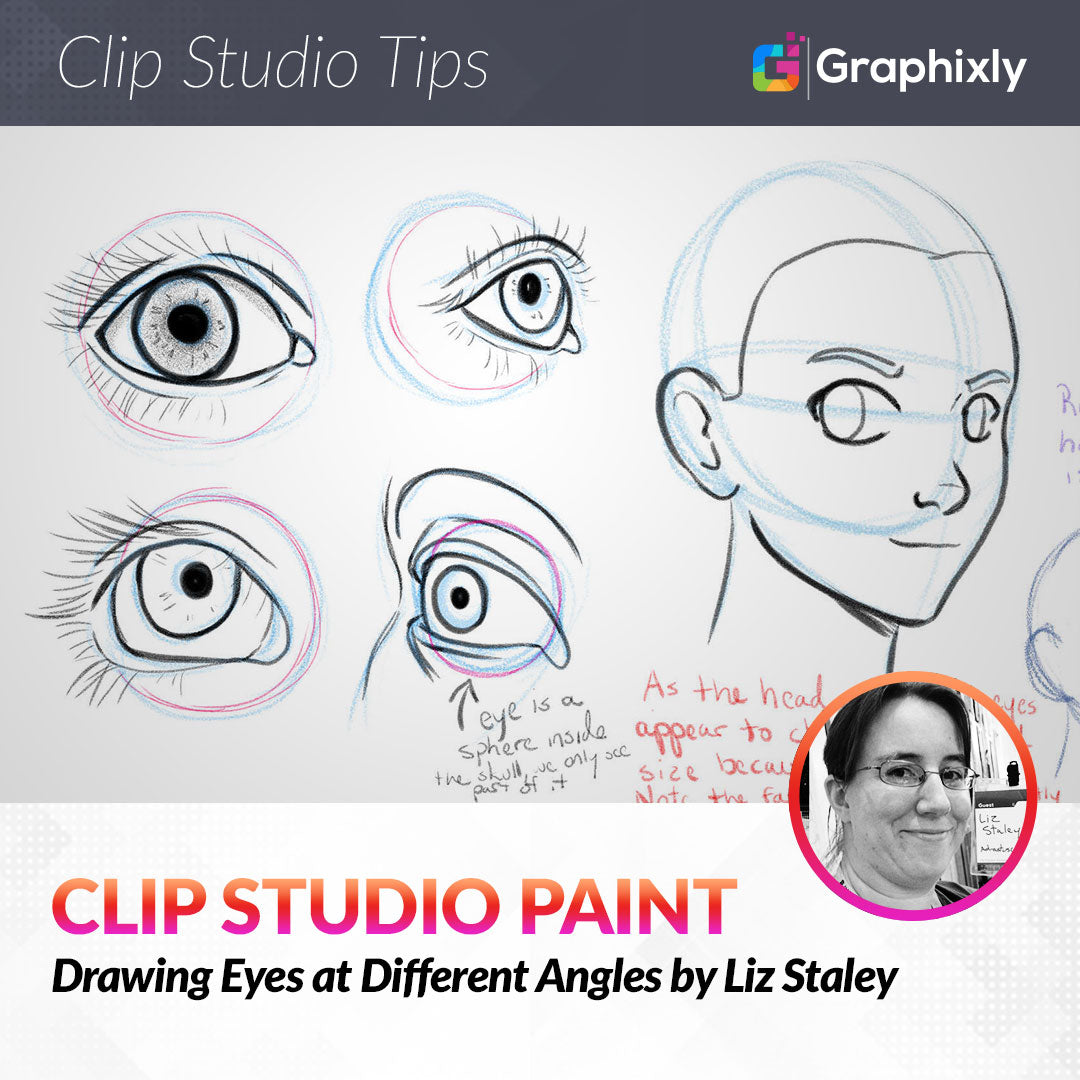
When drawing eyes (unless they’re extremely stylized, i.e. Sonic the Hedgehog, plain black dots, etc), you need to remember that a real eye is a sphere sitting inside of the skull and partially covered by skin.
Because our eye is a sphere it has a curve to it that you can see in the top right and both of the bottom drawings in the image above. When looking at the eye from straight-on our only indication of the sphere shape is the way that the eyelids sit around the eye.
When drawing a more realistic looking eye, we must remember that the eyelids have thickness to them. Also, eyelashes don’t grow right up against the eyeball, but are on the skin so are spaced away from the eye itself.Of course in most stylized drawings of the eye we don’t worry about this, but it is something to think about!
The most important thing to remember about drawing the eye in different angles, I think, is just remembering that the eye has volume AND the head has volume, and you must make sure that the eye and the head keep their volume as you draw them in different positions.
Another important thing to remember when drawing a human (or human-based!) face is the basic proportions of the face.

The eyes usually are located about halfway down the head. The bottom of the nose is typically located halfway between the eye line and the chin. And the mouth is usually located halfway between the bottom of the nose and the chin. You can play with these proportions to create different looks for your characters, but these are the very, VERY basics of “attractive” characters.
Now that we have some basics in mind, let’s look at some different angles.
Eyes from Different Angles
Drawing the face from straight-on is pretty easy, but sometimes the ¾ view or profile views cause strife. Positioning the eyes in these views can be difficult! Let’s look at the ¾ view first.
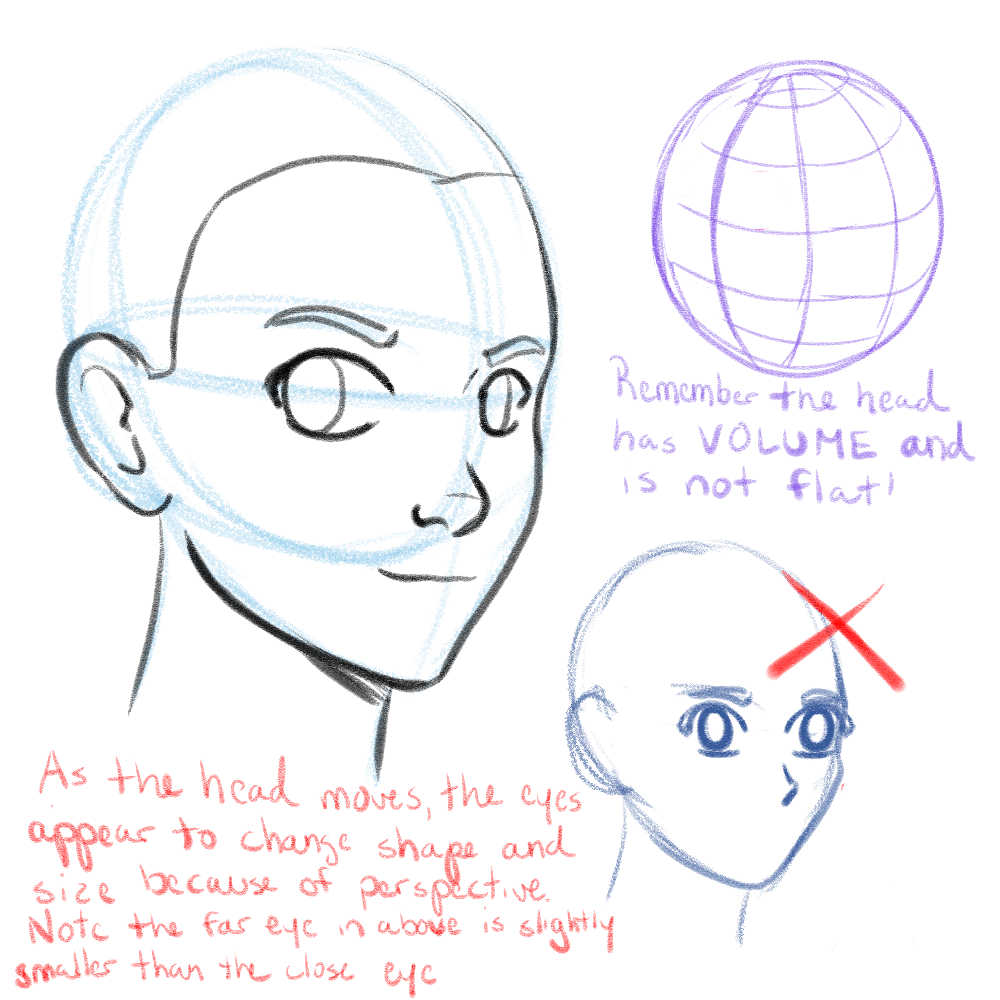
The dark blue head at the bottom right has been drawn with two front-on eyes on it and you can just tell that something isn’t right.
Remember that the head has volume and is a curved surface. In the ¾ view, the far eye will appear to be slightly smaller than the close eye, and also be positioned closer to the nose. In a more ‘extreme’ ¾ view, the far eye can even become partially obstructed by the nose, so keep this in mind. I also tend to draw the tops and bottoms of my anime eyes with more of a curve to the line in this view as well, to give the illusion of the shape of the eyeball.

(It was around this time that I realized I was unintentionally drawing Eleven from Stranger Things in these example images)
I’ve known a lot of beginning artists who struggle with the profile! It can be difficult to get all the features in the right spots, especially when you’re first starting to practice. Remember the basic facial proportions from the previous section when constructing your profile.
In this view, the eye takes on an almost triangular shape (unless you’re stylizing with circular or oval eyes, in which case they would become ellipses!). Remember that in the human eye, the eyelids come together in the corners and form a point. This, combined with the outer curve of the eyeball, makes a three-sided shape with convex curves on each side.
Our last two examples are high-angle and low-angle shots. Let’s look at the high-angle example first!

Remember at both the low and high angles to show the eyes and facial features following the curve of the head. Without this care, it could look like your character has an abnormally large forehead like in the lower right drawing above. Depending on the severity of the high-angle, the mouth will also look closer to the bottom of the nose at this angle. At some angles the nose may even overlap or completely cover the mouth!
The low-angle is one that I have, admittedly, always had a few struggles with, especially with the underside of the chin meeting the neck. But the placement of the facial features is also key to making this angle look convincing. Note the curve of the upper and lower lid lines in the eyes. At this angle we can also see the nostrils and underside of the nose, and the bottom of the nose looks like it’s much closer to the eyes. The mouth also seems to be pushed up closer to the nose as well because of foreshortening.
Also note that the other principles apply when combining angles! For instance, when doing a ¾ view low angle, pay attention to the size of the near and far eye and the overlap of the nose!

By the way, if you want some reference that you can use to practice your faces from different angles, I have two suggestions!
First up is the 3D Sketch Head by リージン
https://assets.clip-studio.com/en-us/detail?id=1782601
This is a FREE 3D asset that you can move around to the angle you want and then use it as reference. It has a basic anime face texture on it, so you can get exactly the angle you want and then use the lines on it as reference to draw over with your own style.
And the second resource is [Line drawing] face angle material of adult male [252 composition] by itina
https://assets.clip-studio.com/en-us/detail?id=1875925
This pack of assets currently costs 500 gold, but it consists of 252 face templates at different angles and rotations. You can’t pose these on your own like the 3D model head above, and they all paste in at once from a big sheet so they can be a bit bulky to work with on smaller canvases when you’re looking for one particular reference angle. But I do like these for getting a quick reference of basic facial feature positioning as I’m drawing my rough sketch, then adding my own style when I clean the sketch up on another layer.
Conclusion
I hope this article gave you a jumping off point if you’re just starting to draw characters or are looking for some tips! This is, of course, just what I’ve picked up in my years of practice and drawing, so feel free to change and adapt things and learn from other artists as well. Practice and have fun!
For more information on CLIP Studio Paint, please visit https://www.clipstudio.net/en or https://graphixly.com